LEUKOTRAP- blood collection system kit
Leukotrap by
Drug Labeling and Warnings
Leukotrap by is a Prescription medication manufactured, distributed, or labeled by Haemonetics Manufacturing Inc. Drug facts, warnings, and ingredients follow.
Drug Details [pdf]
-
LEUKOTRAP® RC SYSTEM DESCRIPTION
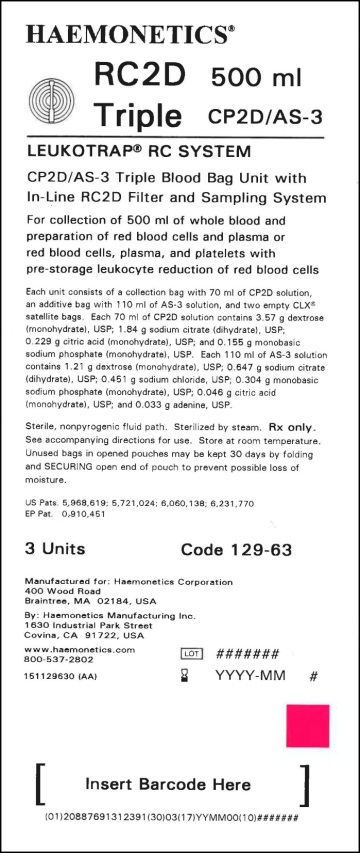
The Leukotrap® RC System CP2D/AS-3 Blood Bag Unit with In-Line RC2D Filter and Sampling System is intended for the collection of whole blood and preparation of red blood cells and plasma or red blood cells, plasma, and platelets with pre-storage leukocyte reduction of red blood cells. The fluid pathway is sterile and non-pyrogenic. Steam Sterilized. RX only.
-
INDICATIONS AND USAGE
Instructions for Use for Systems Containing a Y Sampling Site (YSS) with or without a pre-attached Vacuum Tube Holder or Sample Diversion Pouch (SDP) with a pre-attached Vacuum Tube Holder. See unit foil envelope for specific product code/description being used.
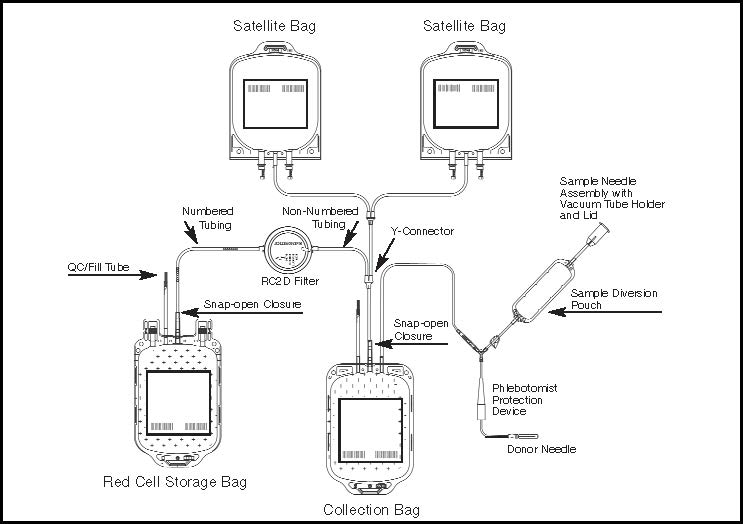
Figure 1- Diagram of the Complete Product Set
I. BLOOD COLLECTION INSTRUCTIONS FORSYSTEMS CONTAINING A Y SAMPLING SITE (YSS) ONLY
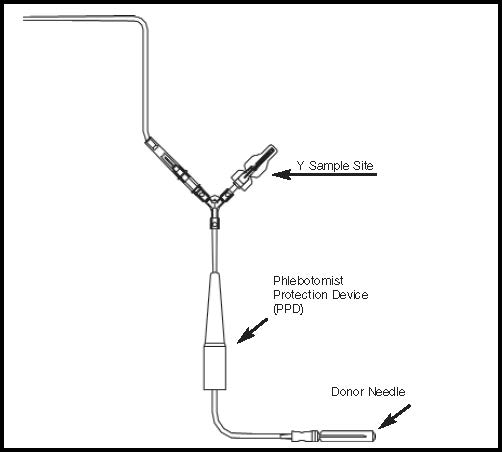
Figure 2- Donor Line with Y Sampling Site Only
ACCOMPLISHING PHLEBOTOMY
- 1. Load blood collection mixer or suspend blood bag on donor scale. Adjust to desired collection volume or weight as per operating instructions for whichever equipment is being used. Place collection bag on blood collection mixer or donor scale as far below donor arm as possible.
- 2. If not previously performed, place a temporary clamp on the donor tubing between the donor needle and Y-connector.
- 3. Disinfect site of phlebotomy and apply pressure to donor arm. If using a blood pressure cuff, inflate to not more than 60 mm Hg. If desired, secure the tubing to the donor’s arm with tape below Phlebotomist Protection Device (PPD). Note:Steps 1 through 3 can be performed in any order.
- 4. Remove donor needle cover by first twisting the cover at the base to break the seal, and then remove cover carefully.
- 5. Perform phlebotomy. Remove the temporary clamp, if used, and ensure there is blood flow.
- 6. Stabilize the donor needle with tape.
- 7. If not previously performed, further stabilize the donor needle by taping the tubing below the PPD.
- 8. Reduce pressure on donor’s arm as needed.
COLLECTING BLOOD
- 1. Collect appropriate volume of blood into collection bag, as indicated on packaging. Notes: If blood collection mixer is used, follow manufacturer's operating instructions. Mix blood and anticoagulant frequently during collection; for example, once every 45 seconds and immediately after collection.
- 2. After required amount of blood has been collected, seal donor tubing between the Y Sampling Site and the collection bag.* Note: If pre-filtration quality control (QC) is to be performed, use the QC tubing attached to the collection bag. If additional tubing is needed, leave the desired amount of tubing containing anticoagulated blood attached to the collection bag.
COLLECTING SAMPLES FROM Y SAMPLING SITE
Note: When using YSS systems with a pre-attached vacuum tube holder, go to Section II.
- 1. For blood sampling, remove the Y Sampling Site needle cover. Ensure the protective sheath is in place over the sampling needle.
- 2. Fasten a vacuum tube holder onto the base of the sampling needle and collect samples.
Precautions:During sample collection ensure the vacuum tubes are centered within the vacuum tube holder and maintain forward pressure on the vacuum tube. Note:After the last tube is collected, it is recommended that the vacuum tube holder be left in place.
DISCONTINUING PHLEBOTOMY
- 1. After blood samples are collected, release any remaining pressure from donor’s arm.
- 2. Remove the tape stabilizing the donor needle and tubing. Advance PPD over the donor needle hub.
- 3. If desired, clamp tubing behind the PPD. Note: Steps 1 through 3 can be performed in any order.
- 4. While holding the top of the PPD, grasp the tubing below the PPD and pull the donor needle into the PPD with a continuous motion until the needle is completely withdrawn and secured into place.
- 5. If desired, insert the PPD into the vacuum tube holder.
- 6. Detach and discard the donor/needle assembly (e.g. needle, PPD, sample diversion pouch, and tubing) in the usual manner.*
- 7. Strip the tubing between seal and collection bag, gently mix the whole blood and allow the tubing to refill OR seal off the tubing, detach and discard in the usual manner.
Continue to "Centrifugation", Section IV, Step 1.
II. BLOOD COLLECTION INSTRUCTIONS FORSYSTEMS CONTAINING A Y SAMPLING SITE (YSS) WITH A PRE-ATTACHED VACUUM TUBE HOLDER
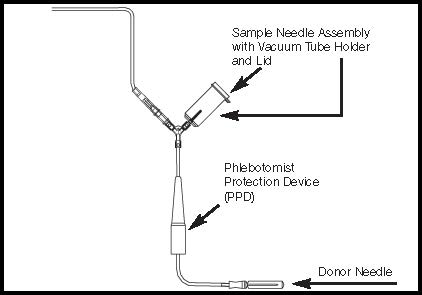
Figure 3- Donor Line with Y Sampling Site and Pre-attached Vacuum Tube Holder with Lid
ACCOMPLISHING PHLEBOTOMY
- 1. Load blood collection mixer or suspend blood bag on donor scale. Adjust to desired collection volume or weight as per operating instructions for whichever equipment is being used. Place collection bag on blood collection mixer or donor scale as far below donor arm as possible.
- 2. If not previously performed,place a temporary clamp on the donor tubing between thedonor needle and Y-connector.
- 3. Disinfect site of phlebotomy and apply pressure to donor arm. If using a blood pressure cuff, inflate to not more than 60 mm Hg. If desired, secure the tubing to the donor’s arm with tape below Phlebotomist Protection Device (PPD). Note:Steps 1 through 3 can be performed in any order.
- 4. Remove donor needle cover by first twisting the cover at the base to break the seal, and then remove cover carefully.
- 5. Perform phlebotomy. Remove the temporary clamp, if used, and ensure there is blood flow.
- 6. Stabilize the donor needle with tape.
- 7. If not previously performed, further stabilize the donor needle by taping the tubing below the PPD.
- 8. Reduce pressure on donor’s arm as needed.
COLLECTING BLOOD
- 1. Collect appropriate volume of blood into collection bag, as indicated on packaging. Notes: If blood collection mixer is used, follow manufacturer's operating instructions. Mix blood and anticoagulant frequently during collection; for example, once every 45 seconds and immediately after collection.
- 2. After required amount of blood has been collected, seal donor tubing between the Y Sampling Site and the collection bag.* Note: If pre-filtration quality control (QC) is to be performed, use the QC tubing attached to the collection bag. If additional tubing is needed, leave the desired amount of tubing containing anticoagulated blood attached to the collection bag.
COLLECTING SAMPLES FROM Y SAMPLING SITE SYSTEMS WITH A PRE-ATTACHED VACUUM TUBE HOLDER
- 1. Open lid of the vacuum tube holder and collect samples. Precautions: During sample collection ensure the vacuum tubes are centered within the vacuum tube holder and maintain forward pressure on the vacuum tube.
- 2. After the final sample collection, close the lid on the vacuum tube holder.
DISCONTINUING PHLEBOTOMY
- 1. After blood samples are collected, release any remaining pressure from donor’s arm.
- 2. Remove the tape stabilizing the donor needle and tubing. Advance PPD over the donor needle hub.
- 3. If desired, clamp tubing behind the PPD. Note: Steps 1 through 3 can be performed in any order.
- 4. While holding the top of the PPD, grasp the tubing below the PPD and pull the donor needle into the PPD with a continuous motion until the needle is completely withdrawn and secured into place.
- 5. If desired, insert the PPD into the vacuum tube holder.
- 6. Detach and discard the donor/needle assembly (e.g. needle, PPD, sample diversion pouch, and tubing) in the usual manner.*
- 7. Strip the tubing between seal and collection bag, gently mix the whole blood and allow the tubing to refill OR seal off the tubing, detach and discard in the usual manner.
- 8. Continue to "Centrifugation", Section IV, Step 1.
III. BLOOD COLLECTION INSTRUCTIONS FOR SYSTEMS CONTAINING A SAMPLE DIVERSION POUCH WITH A PRE-ATTACHED VACUUM TUBE HOLDER
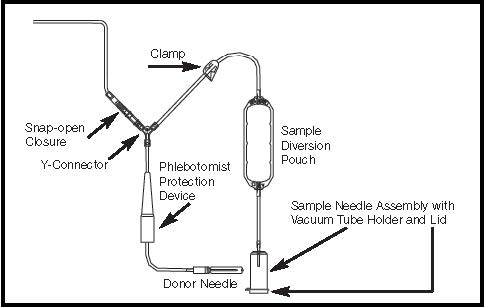
Figure 4- Donor Line with Sample Diversion Pouch with a Pre-attached Vacuum Tube Holder
ACCOMPLISHING PHLEBOTOMY:
- 1. Load blood collection mixer or suspend blood bag on donor scale. Adjust to desired collection volume or weight as per operating instructions for whichever equipment is being used. Place collection bag on blood collection mixer or donor scale as far below donor arm as possible.
- 1. If not previously performed, place a temporary clamp on the donor tubing between the donor needle and Y-connector, if required.
- 2.
Disinfect site of phlebotomy and apply pressure to donor arm. If using a blood pressure cuff, inflate to not more than 60 mm Hg. If desired, secure the tubing to the donor’s arm with tape below Phlebotomist Protection Device (PPD). Note: Steps 1 through 3 can be performed in any order.
- 3. Remove donor needle cover by first twisting the cover at the base to break the seal, and then remove cover carefully.
- 4. Perform phlebotomy. Remove the temporary clamp, if used, and ensure there is blood flow. The donor’s blood will automatically flow into the sample diversion pouch.
- 5. Stabilize the donor needle with tape. Warning: To avoid risk of air embolism to donor, do not squeeze sample diversion pouch while tubing to the pouch is open. Ensure sample diversion pouch remains below the donor arm while tubing to the pouch is open. Note: Do not reduce pressure on donor’s arm until the snap-open closure has been opened (see Step 10).
- 6. If not previously performed, further stabilize the donor needle by taping the tubing below the PPD.
- 7. Once the sample diversion pouch is filled with the desired amount of blood, close clamp immediately on tubing between the sample diversion pouch and Y connector.
- 8. Seal tubing between the sample diversion pouch and Y connector to maintain sterility of the system prior to sample collection.*
- 9. Open snap-open closure on the Y connector to initiate blood flow into the collection bag. Reduce pressure on donor’s arm as needed.
COLLECTING SAMPLES FROM SAMPLE DIVERSION POUCH:
- 1. Position the sample diversion pouch so that the air rises to the top of the pouch (away from the vacuum tube holder).
- 2. Open lid of the vacuum tube holder and collect samples. Precautions: During sample collection ensure the vacuum tubes are centered within the vacuum tube holder and maintain forward pressure on the vacuum tube. Collect blood samples from the sample diversion pouch into vacuum tube(s) within approximately four minutes to avoid possible clot formation. Drawing air into a vacuum tube may cause hemolysis.
- 3. After the final sample collection, close the lid on the vacuum tube holder.
COLLECTING BLOOD:
- 1. Collect appropriate volume of blood into collection bag as indicated on packaging. Notes: If blood collection mixer is used, follow manufacturer's operating instructions. Mix blood and anticoagulant frequently during collection; for example, once every 45 seconds and immediately after collection.
DISCONTINUING PHLEBOTOMY:
- 1. After required amount of blood has been collected, seal donor tubing between snap-open closure and collection bag.*
- 2. Note: If pre-filtration quality control (QC) is to be performed, use the QC tubing attached to the collection bag. If additional tubing is needed, leave the desired amount of tubing containing anticoagulated blood attached to the collection bag.
- 3. Release any remaining pressure from donor’s arm.
- 4. Remove the tape stabilizing the donor needle and tubing. Advance PPD over the donor needle hub.
- 5.
If desired, clamp tubing behind the PPD.
Note: Steps 1 through 4 can be performed in any order.
While holding the top of the PPD, grasp the tubing below the PPD and pull the donor needle into the PPD with a continuous motion until the needle is completely withdrawn and secured into place.
- 6. While holding the top of the PPD, grasp the tubing below the PPD and pull the donor needle into the PPD with a continuous motion until the needle is completely withdrawn and secured into place.
- 7. If desired, insert the PPD into the vacuum tube holder.
- 8. Detach and discard the donor/needle assembly (e.g. needle, PPD, sample diversion pouch, and tubing) in the usual manner.*
- 9. Strip the tubing between seal and collection bag, gently mix the whole blood and allow the tubing to refill OR seal off the tubing, detach and discard in the usual manner.
IV. BLOOD PROCESSING INSTRUCTIONS:CENTRIFUGATION
- 1. Load unit into centrifuge bucket, ensuring that the tubing stays in the top half of the bucket. When bags and tubing are positioned in the bucket, place the red blood cell filter in a horizontal position on top of the entire assembly and secure with tape, band, or Leukotrap® Strap.
- 2. Centrifuge at appropriate conditions to produce desired components.
V. BLOOD PROCESSING INSTRUCTIONS: PREPARING SET
Note:Prior to expression, ensure tubing between the Y-connector and the filter (non-numbered tubing) is clamped. For efficient processing, the tubing may be clamped prior to removing the unit from the centrifuge bucket.
- 1. Carefully remove the unit from the centrifuge and place the bag containing red cells in the plasma expressor.
- 2. Gently apply expressor pressure.
- 3. If not previously clamped, clamp the non-numbered tubing between the Y-connector and the filter.
- 4. Clamp tubing to extra satellite bag, if present.
VI. BLOOD PROCESSING INSTRUCTIONS: EXPRESSING PLASMA
- 1. Open snap-open closure of the bag containing red cells and express plasma or platelet-rich plasma into a satellite bag.
- 2. Stop expression by clamping or sealing the tubing leading to satellite bag(s) and release expressor pressure.
- 3. If not already sealed, seal tubing below the Y-connector leading to all satellite bags.* Detach and set aside the plasma or platelet-rich plasma for further processing.
Notes: If preparing a platelet concentrate, the platelet-rich plasma should be separated from the red blood cells within 8 hours after collection. If preparing Fresh Frozen Plasma, the plasma should be separated from the red blood cells and placed in the freezer at –18 °C or colder within 8 hours after blood collection. If preparing Plasma Frozen within 24 Hours after Phlebotomy, the plasma should be separated from the red blood cells and placed in the freezer at –18 °C or colder within 24 hours after blood collection.
VII. BLOOD PROCESSING INSTRUCTIONS: TRANSFERRING ADDITIVE
Note:The snap-open closure may be opened prior to hanging the bag containing the AS-3 additive solution for additive transfer, provided the non-numbered tubing between the bag containing the red cells and the filter is clamped.
- 1. Hang the bag containing the AS-3 additive solution so that the numbered tubing is fully extended and ensure the filter is in a vertical position and above the bag.
- 2. Open clamp or snap-open closure of the bag containing the AS-3 additive solution, and transfer to the bag containing red blood cells. Note: AS-3 additive solution should be added to the bag containing the red blood cells immediately after plasma or platelet-rich plasma removal.
- 3. Transfer AS-3 additive solution under one of the following conditions:
- A. Within 8 hours of collection if blood is held at room temperature.
- B. Within 72 hours of collection if blood is refrigerated after collection.
VIII. BLOOD FILTRATION INSTRUCTIONS
- 1. Clamp the non-numbered tubing prior to raising the bag containing red blood cells and AS-3 additive solution for mixing in order to avoid the introduction of air into the filter.
- 2. Mix red cells gently and thoroughly.
- 3. Hang the collection bag at one of the following heights:
- A. 60 ± 2 inches for blood stored and filtered at room temperature.
- B. 60 to 72 inches for blood stored and filtered at 1—6 °C.
- 4. Ensure filter is vertical and remove clamp to allow red blood cells to gravity flow through the filter and into the red cell storage bag. Notes: Do not apply mechanical or manual pressure to increase flow rate. Filtration can begin at room temperature up to 8 hours or at 1—6 °C up to 72 hours post-collection. If unit has not completely filtered by 8 hours post-collection at room temperature, filtration must be completed at 1—6 °C. Filtration at maximum head height may shorten filtration times. “Head height” is the distance from the top of the bag containing the blood to be filtered to the horizontal plane where the filtered blood bag rests. Filtration can be unattended. Filtration times can be influenced by collection and processing conditions and biological variability of donors. Experimental data with some filter products indicate that a prolonged filtration can be an indication of sub-optimal leukocyte reduction.
- 5. Filtration is complete when the collection bag is empty. To maximize red blood cell recovery, allow the tubing above the filter to empty.
- 6. Clamp and seal tubing below the filter.* The numbered tubing downstream of the filter will not drain. Notes: If the numbered tubing below the filter has drained (emptied) after filtration, it is recommended to perform a residual white blood cell count on the unit. Do not strip tubing prior to sealing the tubing below the filter. If it is desired to strip blood from numbered tubing, do so only after tubing has been sealed close to the filter and detached. If it is necessary to strip blood from numbered tubing, care should be taken when stripping is performed. Increased (mechanical) hemolysis has been associated with stripping when blood is cold and has a higher hematocrit. Do not strip forcefully or frequently against a snap-open closure.
- 7. Detach and discard collection bag and filter.*
- 8. If desired, seal at or adjacent to "X" marks on tubing to provide numbered segments of anticoagulated blood for typing or crossmatching.* If quality control is to be performed on post-filtration sample, use the attached QC line on the bag containing red cells.
- 9. Store CP2D/AS-3 preserved red blood cells at 1—6 °C for up to 42 days and use as indicated. Note: If AS-3 additive solution is not used, whole blood or red blood cells in CP2D alone may be stored at 1—6 °C for up to 21 days.
IX. QUALITY CONTROL TESTING
- Percent red cell recovery should be determined by following FDA Guidance entitled “ Guidance for Industry - Pre-Storage Leukocyte Reduction of Whole Blood and Blood Components Intended for Transfusion”, published in September 2012.
- During processing, always observe the following precautions:
- 1. Sealing should be done in a manner that avoids fluid splatter.
- 2. Always dispose of blood-contaminated products in a manner consistent with established BIOHAZARD safety procedures.
- WARNINGS
-
PRECAUTIONS
General
- 1. Use aseptic technique.
- 2. Use only if solutions are clear.
- 3. If moisture is observed on the outside of the collection system when removed from the cellophane pouch, subsequent handling and storage of an unused set within the foil pouch could encourage the growth of mold on the base label. Unused bags in opened foil pouches may be kept 30 days by folding and SECURING open end of pouch to prevent possible loss of moisture.
- ADVERSE REACTIONS
-
DOSAGE AND ADMINISTRATION
- 1. Filter and process whole blood within 72 hours of collection.
- 2. When whole blood is at room temperature, filter within 8 hours of collection.
- 3. When whole blood is at 1 – 6 °C, filter within 72 hours of collection.
- 4. Follow AABB recommended guidelines for heavy spin centrifugation for component preparation. For optimal red blood cell (RBC) quality do not exceed 5000g.
- 5. This product is not made with natural rubber latex.
- 6.
Tubing Specifications:
- a. OD = 0.163”
- b. ID = 0.114”
- c. Wall = 0.0245”
- 7.
Fill line only:
- d. OD = 0.160”
- e. ID = 0.114”
- f. Wall = 0.0245”
- HOW SUPPLIED
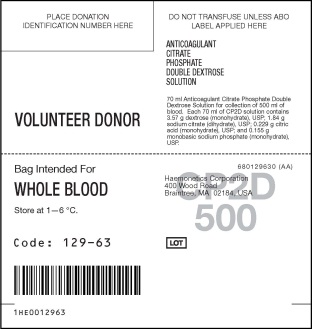
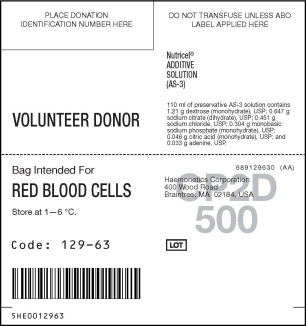
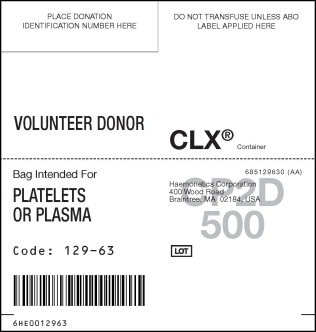
- PACKAGE/LABEL PRINCIPAL DISPLAY PANEL
-
REFERENCES
Haemonetics®, Haemonetics The Blood Management Company® and Leukotrap® are trademarks or registered trademarks of Haemonetics Corporation in the US, other countries or both.
Manufactured for:
Haemonetics Corporation
400 Wood Road
Braintree, MA 02184, USA
By: Haemonetics Manufacturing Inc.
1630 Industrial Park Street
Covina, CA 91722, USA
www.haemonetics.com
800-537-2802
IFU P/N 147129621 (AA)
-
INGREDIENTS AND APPEARANCE
LEUKOTRAP
blood collection system kitProduct Information Product Type HUMAN PRESCRIPTION DRUG Item Code (Source) NDC: 53157-129 Packaging # Item Code Package Description Marketing Start Date Marketing End Date 1 NDC: 53157-129-63 18 in 1 CARTON 1 1 in 1 BAG; Type 0: Not a Combination Product Quantity of Parts Part # Package Quantity Total Product Quantity Part 1 1 BAG 70 mL Part 2 1 BAG 110 mL Part 1 of 2 CP2D
cp2d solutionProduct Information Route of Administration INTRAVENOUS DEA Schedule CII Active Ingredient/Active Moiety Ingredient Name Basis of Strength Strength DEXTROSE (UNII: IY9XDZ35W2) (DEXTROSE - UNII:IY9XDZ35W2) DEXTROSE 3.57 g in 70 mL Packaging # Item Code Package Description Marketing Start Date Marketing End Date 1 70 mL in 1 BAG; Type 0: Not a Combination Product Marketing Information Marketing Category Application Number or Monograph Citation Marketing Start Date Marketing End Date NDA NDA820915 09/22/1983 Part 2 of 2 AS3
as3 solutionProduct Information Route of Administration INTRAVENOUS DEA Schedule CII Active Ingredient/Active Moiety Ingredient Name Basis of Strength Strength ADENINE (UNII: JAC85A2161) (ADENINE - UNII:JAC85A2161) ADENINE 0.033 g in 110 mL DEXTROSE (UNII: IY9XDZ35W2) (DEXTROSE - UNII:IY9XDZ35W2) DEXTROSE 1.21 g in 110 mL Packaging # Item Code Package Description Marketing Start Date Marketing End Date 1 110 mL in 1 BAG; Type 0: Not a Combination Product Marketing Information Marketing Category Application Number or Monograph Citation Marketing Start Date Marketing End Date NDA NDA820915 09/22/1983 Marketing Information Marketing Category Application Number or Monograph Citation Marketing Start Date Marketing End Date NDA NDA820915 09/22/1983 Labeler - Haemonetics Manufacturing Inc (078598396) Establishment Name Address ID/FEI Business Operations Haemonetics Manufacturing Inc 078598396 MANUFACTURE(53157-129)
Trademark Results [Leukotrap]
Mark Image Registration | Serial | Company Trademark Application Date |
|---|---|
 LEUKOTRAP 73628848 1443997 Live/Registered |
MILES LABORATORIES, INC. 1986-11-06 |
© 2026 FDA.report
This site is not affiliated with or endorsed by the FDA.
