ADSOL RED CELL PRESERVATION (anticoagulant citrate phosphate dextrose- cpd and adsol preservation kit
ADSOL RED CELL PRESERVATION by
Drug Labeling and Warnings
ADSOL RED CELL PRESERVATION by is a Prescription medication manufactured, distributed, or labeled by Fenwal, Inc., Fresenius Kabi Horatev CZ s.r.o.. Drug facts, warnings, and ingredients follow.
Drug Details [pdf]
-
SPL UNCLASSIFIED SECTION
Contains Sample Diversion System for the collection of unanticoagulated whole blood samples for laboratory testing.
Description
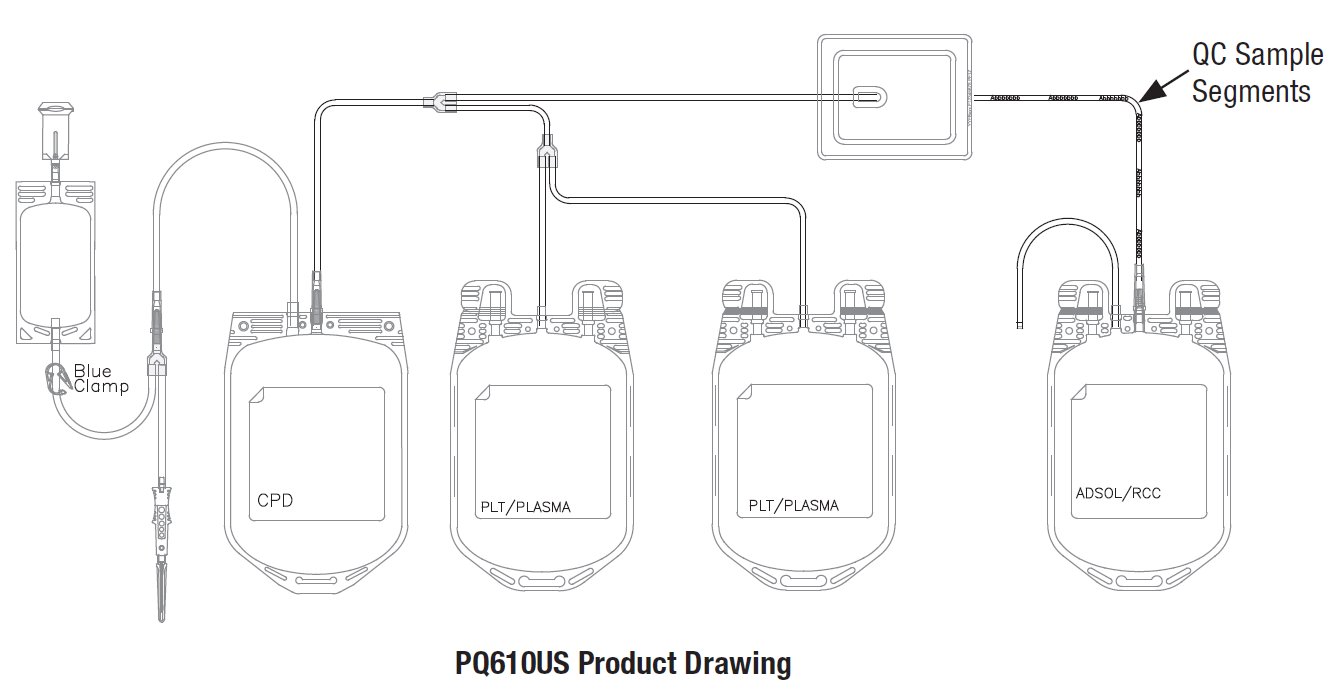
The Composelect System is a triple configuration intended for use in collecting Whole Blood and separation of blood components including Red Blood Cells, Plasma, and Platelets.
The Composelect system has a sterile, non-pyrogenic fluid path and is intended for single use only.
Integral filter unit intended for leukocyte reduction of AS-1 red blood cells:
- At ambient temperature up to 8 hours after blood collection.
- At refrigerated temperature (1°C to 6°C) up to 3 days after blood collection if AS-1 red blood cells are prepared within 3 days after whole blood collection.
The leukocyte reduced red blood cells may then be stored for up to 42 days after collection.
Platelets prepared and stored in the satellite container included in the Composelect system can be
stored for 5 days at 20°C to 24°C.
General Precautions
- Store at controlled room temperature, from 20°C to 25°C (68°F to 77°F). Excursions between 15°C and 30°C (59°C and 86°F) with transient spikes up to 40°C are permitted as long as they do not exceed 24 hours.
- Reference: United States Pharmacopeia, General Notices. United States Pharmacopeial Convention, Inc. 12601 Twinbrook Parkway, Rockville, MD.
- Protect from freezing.
- Avoid excessive heat.
- Do not squeeze or fold the filter
- Inadequate clamping of the donation line can cause non-sterile air to enter the collection container once the needle cover has been removed.
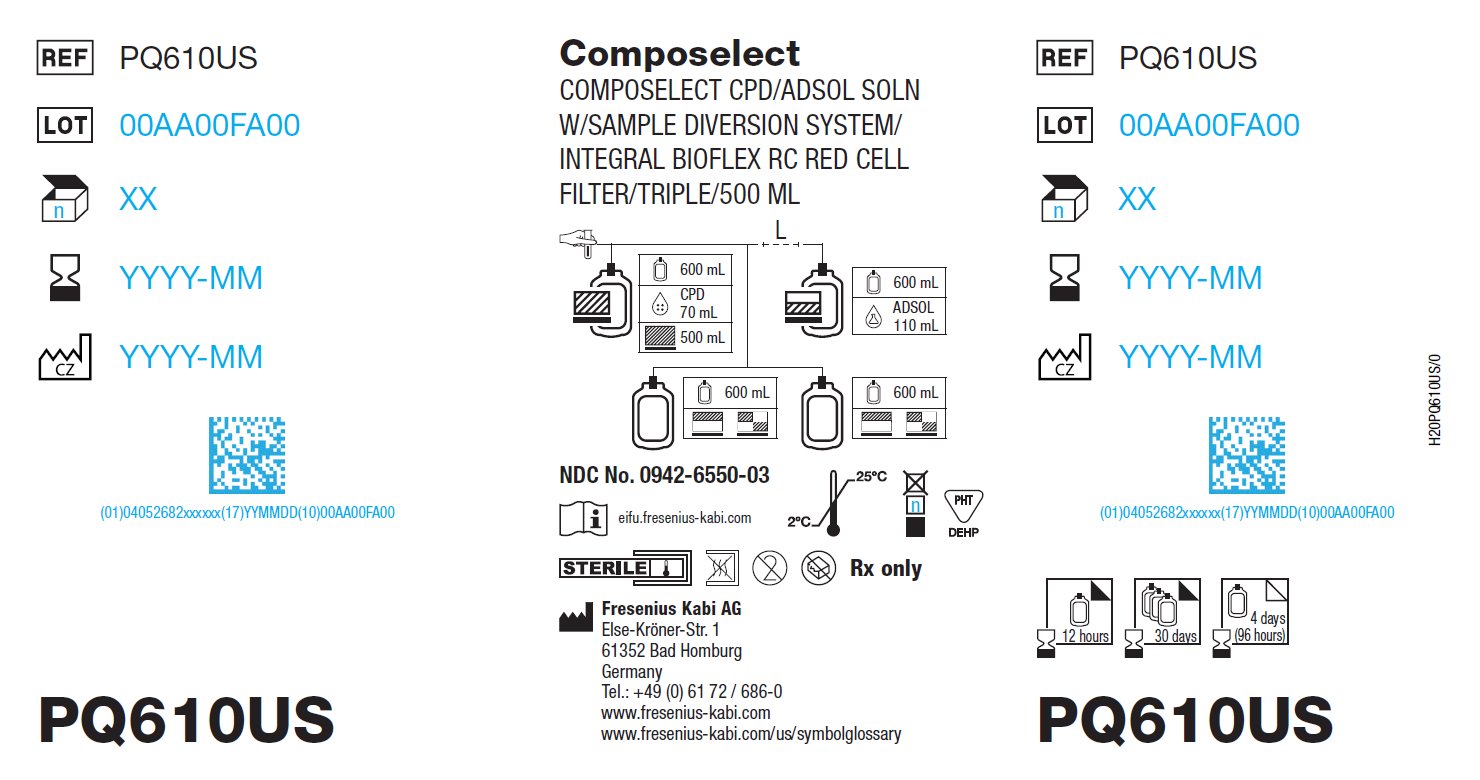
- Use the cannula activation tool (cannula cracker) or qualified automated system only to open the X-Breaker in the top seal of the primary (CPD) and Adsol containers. Do not use the tool to open the cannula in the donor lead. This must be opened manually. See Figure 1.
- Once the original secondary packaging has been opened, carefully close again by folding and securing the open end of the secondary packaging. The system has to be used within 30 days.
- Unused units from the secondary packaging are to be returned to the secondary packaging within 12 hours to maintain the 30-day shelf life. Units may be removed from the secondary packaging and returned once.
- Units removed from the primary packaging (that are not returned within 12 hours) must be used within 4 days (96 hours). Units out of the primary packaging for longer than 96 hours must be discarded.
Directions for Use
Pre-collection Inspection
Examine the collection container and storage containers. Do not use the container if you observe any of the following:
- Visible damage, defects or non-conformity to the product representing a risk to the integrity of the system
- Solutions are unusual color, not clear, or contain particulate matter
- Kinks and large dents in the tubing
- Damaged or loose components of the product
- In-line cannula is broken and/or anticoagulant is present in the sample pouch or in the tubing from the in-line cannula to the sample pouch and donor needle (see Figure 1)
- Labels on the containers are absent, damaged, or defaced.
Note: Condensation in the empty tubing of the Composelect System is expected as a result of the sterilization process.
Collection Procedure
Use aseptic technique.
1. Identify Composelect System using appropriate donor identification system.
2. Adjust donor scale to desired collection weight and position the Composelect system on the donor scale as far as possible below donor arm.
Note: When using a Composelect System on a donor scale, ensure that the filter is not placed between the containers as this could cause improper mixing of the blood with anticoagulant.
3. Unwind the tubing and ensure it is torsion-free to prevent the needle from turning while drawing blood. See Figure 1.
4. Clamp donor tubing between Fenwal HighFlo1 needle and Y-junction with a clamp. (This step may be performed prior to step 1 or 2.)
Notes: Ensure that the sample pouch remains below the donor’s arm.
5. Following facility procedures, disinfect site of venipuncture, then apply pressure to donor’s arm.
6. Remove Fenwal HighFlo1 needle cover per instructions below:
- a) Holding the hub and cover near tamper-evident seal, twist cover and hub in opposite directions to break seal.
- b) Remove and discard needle cover, being careful not to drag the cover across the needle point.
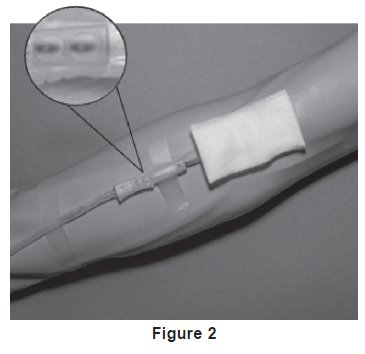
7. Following facility procedures, perform venipuncture and appropriately secure donor needle and/or tubing. When good blood flow is established, stabilize the front of the needle guard to arm with tape (see Figure 2).
8. Allow the sample pouch to fill with blood according to center procedure. Monitor blood flow into sample pouch.
Precautions:
- Do not elevate or squeeze the sample pouch as this could cause blood to backflow from the sample pouch into the collection system.
- Once the sample pouch is filled to desired volume, complete steps 9 – 15 within approximately 4 minutes to avoid possible clot formation in the tubing and/or sample pouch.
9. Close the blue clamp on tubing between the Y-junction and the sample pouch.
10. Break the in-line cannula below the Y-junction in the donor tubing to the primary container allowing blood collection to proceed. To completely break the in-line cannula, grasp with both hands. Snap it at a 90° angle in one direction, and then bend it at a 90° angle in the opposite direction. Ensure the inline
cannula is completely broken and that the blood flows freely to the primary container.
Precaution:
- The in-line cannula must be opened by hand. Do not use any manual hand opening tools, such as the Fenwal Cannula Cracker.
- Failure to break the in-line cannula completely may result in restricted blood flow.
Note: Mix blood and anticoagulant in the primary container immediately, at several intervals during collection, and immediately after collection.
11. Following blood center procedures, hermetically seal the tubing between the sampling site and the Y-junction to maintain sterility of the blood collection system prior to removing blood samples.
Warning:
Do not proceed with the remaining steps until the tubing leading to the sample pouch is hermetically sealed between the sampling site and the Y-junction. To maintain the whole blood
collection container as a closed system, the tubing between the sample pouch and Y-junction must be hermetically sealed prior to inserting the access device into the sampling site. Failure to do so may lead to contamination of the whole blood collection.
12. To collect samples, open the cap of the sample access device, then hold the sample pouch in an upright position with the access device pointing downwards.
13. Directly align the vacuum sample tube with the internal needle in the access device. Insert vacuum sample tube into device until the stopper is punctured.
14. Allow vacuum sample tube to fill with blood then remove from the access device.
Note: Don’t squeeze the sample pouch.
15. Repeat steps 13 and 14 until the desired number of vacuum sample tubes have been filled.
16. Collect 500 mL ±10% (450 - 550 mL) volume of blood.
Note: The volume of anticoagulant is sufficient for the blood collection indicated on the Composelect System ± 10%.
Precaution: Once the desired blood volume is collected, complete steps 17 to 22 within approximately 4 minutes to avoid possible clot formation in the tubing.
17. Release pressure on donor's arm. Apply clamp to donor tubing between needle and the Y-junction.
18. Hermetically seal donor tubing between the in-line cannula and the primary container.
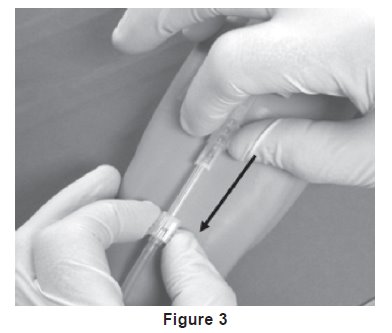
19. Withdrawal of Needle (see Figure 3).
Precaution: The needle guard must be held stationary while the needle is withdrawn into it.
- a) Place folded sterile gauze over puncture site and hold in place with finger tip without exerting pressure.
- b) Hold sides of needle guard near the front, between the index finger and thumb. Pull the hub back smoothly until the needle is completely enclosed and securely locked into the needle guard.
- c) Confirm the needle is completely enclosed and securely locked into the needle guard.
20. Grip the retracted needle by the needle hub and place the needle into the sample access device, then close the cap to secure the needle.
21. Remove and discard the sampling system and needle guard into an appropriate biohazardous waste container following facility procedures. If donor tubing is also to be discarded, hermetically seal donor tubing directly above the primary container and remove.
22. If the donor tubing is not hermetically sealed directly above the primary container, then strip the blood from the remaining donor tubing into the primary container and mix. If desired, allow tubing to refill.
23. Follow your facility procedure to place the unit into appropriate temporary storage at ambient temperature or with sufficient coolant to lower the temperature continuously toward 1-10 °C until delivered to the component processing facility.
Component Preparation
Notes:
- If a platelet concentrate is to be prepared, it should be separated within 8 hours after blood collection.
- Fresh frozen plasma should be separated from the red blood cells and placed in the freezer at -18°C or colder within 8 hours after blood collection.
- Adsol red cell preservation solution should be added to the red blood cells immediately after the removal of plasma.
- Preparation of AS-1 red blood cells may vary depending on processing option selected:
- a) Within 8 hours of blood collection if whole blood is held at ambient temperature.
- b) Within 3 days of blood collection if whole blood is stored at 1°C - 6°C.
24. At the appropriate time, prepare the Composelect System for centrifugation.
25. Thoroughly mix the primary container end over end.
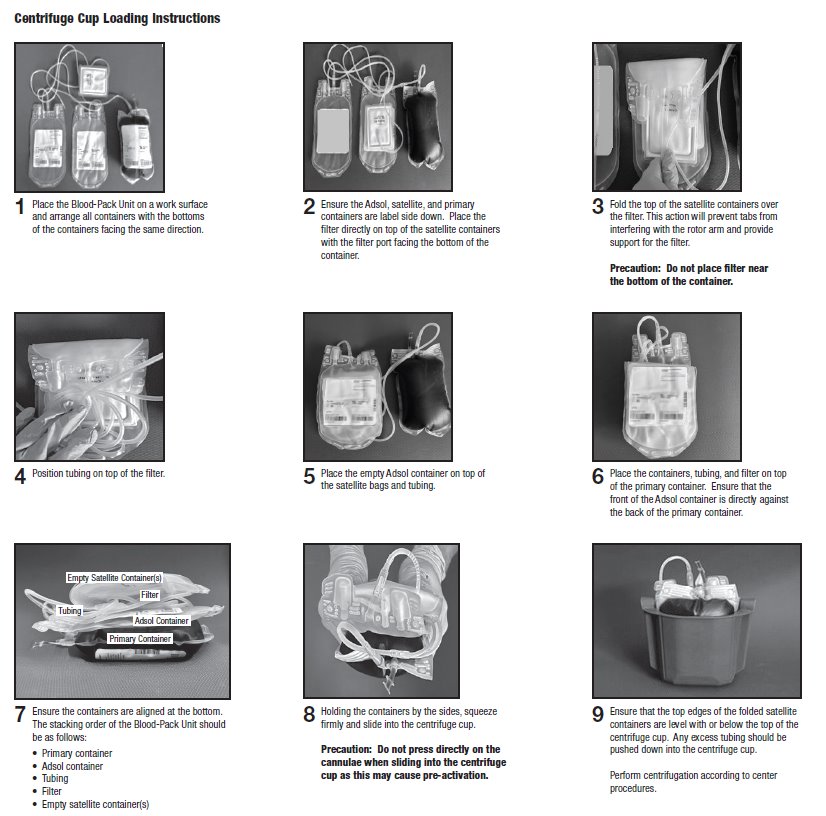
26. Load the containers into a centrifuge cup per the instructions on page 4.
Notes:
- This guide is one method for centrifuge cup loading. The specific stacking order and methods may vary depending on the workstation setup, centrifuge equipment, and facility-specific Standard Operating Procedures.
- It is important to pack the filter properly in the centrifugation cup to avoid damage to the filter during centrifugation.
- Do not place the filter in the lower half of the centrifuge cup. See step 3 on page 4 for proper placement of filter.
- Do not press directly on the cannulae while performing any of the cup loading steps as this may cause pre-activation of the cannulae.
27. After loading the Composelect System into the centrifuge cup, perform centrifugation according to facility procedures.
28. Following centrifugation, remove containers from the centrifuge cup, taking care not to disturb the red blood cell / plasma interface.
29. Place primary container in a plasma extractor and apply pressure. Clamp off tubing above the filter to prevent plasma flow into filter during plasma transfer. Clamp off tubing below Y-junction leading to secondary Transfer Pack container not to be filled with plasma. Open the cannula on the top of the primary container to transfer plasma into the empty transfer pack container.
Note: A manual tool or automated breaker may be used to open the cannula on the top of the primary
container.
30. When the desired amount of plasma has been removed, clamp the tubing between the plasma container and the Y-junction closest to the plasma container and release pressure on the primary container.
31. Hermetically seal and remove satellite containers.
Addition of Adsol to Red Cells
32. Position the Adsol red cell preservation solution container ensuring that the primary container remains below the level of the filter during prime.
33. Open the cannula on the Adsol solution container and remove the clamp between the primary container and the filter.
Note: A manual tool or automated breaker may be used to open the cannula on the top of the Adsol solution container.
34. Transfer the Adsol through the filter into the primary container.
35. After prime is complete, clamp the tubing between the filter and primary container.
36. Mix the Adsol red cell preservation solution and red cells thoroughly.
Notes:
- If the Adsol red cell preservation solution is not added to the red cells, ensure appropriate labeling of the red cell container. Also ensure that tubing with unique segment numbers are attached, as the primary container does not include tubing with segment numbers. Manufacture of CPD red cells for transfusion must include proper labeling of the container, as well as attached tubing, with unique segment numbers.
- A CPD red cell without Adsol red cell preservation solution may be stored between 1ºC and 6ºC up to 21 days after collection. The attached Bioflex RC filter should not be used to leukoreduce a CPD red cell product without Adsol red cell preservation solution and should be detached from the primary container.
- CPD Red Blood Cells without Adsol can be leukoreduced using an appropriate “dock-on” filter.
Integral Red Cell Filtration
Precaution: Red blood cell products collected from certain donors may have extended filtration times and the potential for ineffective filtration and leukoreduction.
37. Mix unfiltered AS-1 red blood cells thoroughly. Invert the unfiltered AS-1 red blood cells and hang the filter set such that the filter remains vertical. To achieve maximum flow rate, allow the set to hang to full length. The storage container must remain below the level of the filter during filtration.
38. Filtration must be initiated within 8 hours after collection if Red Blood cells are maintained at ambient temperature and filtration is performed at ambient temperature or within 3 days after collection if Red Blood Cells are stored at 1°C - 6°C and filtration is performed at 1°C - 6°C
39. Inspect all tubing to ensure it hangs freely without kinks.
40. Remove the clamp above the filter to start filtration.
Note: Manual or mechanical pressure should not be used to increase the flow rate through the filter. Tubing below the filter should not be stripped at any time during the filtration process.
Note: If filtration of red cells is initiated at ambient temperature, the filtration process can be completed at either ambient or refrigerated temperature prior to storing the red cells between 1° and 6°C. However, for optimal filtration time, it is recommended to complete the filtration at ambient temperature.
41. When filtration is complete, air can be observed in the inlet side of the filter. Hermetically seal and detach the tubing below the filter.
42. Make segments on the post-filter tubing as indicated on the product diagram, and leave segments attached to the leukoreduced red cell storage container. QC samples may be prepared by stripping the red blood cells in the tubing, thoroughly mixing the red blood cells, then refilling the tubing and sealing the segments. Discard the filter and the empty primary container.
43. Store the AS-1 red blood cells, leukocytes reduced between 1ºC and 6°C.
44. Transfuse the red cells within 42 days of collection.
45. Quality control testing of Red Blood Cells, AS-1 Added, Leukocytes Reduced, including testing for residual white blood cells, should be performed in accordance with regulatory requirements.
Warning: Failure to achieve closed system processing conditions negates the extended storage claim and the red blood cell product must be transfused within 24 hours.
46. Dispose of waste in appropriate biohazard container or according to local regulatory requirements.
Note: Commercially available spacers (such as a Blood Bag Insert or similar) or other methods may be followed to take up space in the cup. When used, the spacer must be placed between the empty satellite
containers and the centrifuge cup.
1 Van der Meer, P.F., & de Korte, D. “Increase of blood donation speed by optimizing the needle-to-tubing connection: an application of donation software.” Vox Sanguinis 2009, 97: 21-25
Fresenius Kabi AG
Else-Kröner-Str. 1
61352 Bad Homburg
Germany
Tel.: +49 (0) 61 72 / 686-0
www.fresenius-kabi.com
www.fresenius-kabi.com/us/symbolglossary
© 2025 Fresenius Kabi AG. All rights reserved.
All trademarks referred to are property of their respective owners.
33839 [E] 2025/10
- PACKAGE LABEL PRINCIPAL DISPLAY PANEL
-
INGREDIENTS AND APPEARANCE
ADSOL RED CELL PRESERVATION
anticoagulant citrate phosphate dextrose (cpd) and adsol preservation kitProduct Information Product Type HUMAN PRESCRIPTION DRUG Item Code (Source) NDC: 0942-6550 Packaging # Item Code Package Description Marketing Start Date Marketing End Date 1 NDC: 0942-6550-03 4 in 1 CARTON 1 NDC: 0942-6550-02 5 in 1 POUCH 1 NDC: 0942-6550-01 1 in 1 KIT; Type 1: Convenience Kit of Co-Package Quantity of Parts Part # Package Quantity Total Product Quantity Part 1 1 BAG 70 mL Part 2 1 BAG 110 mL Part 1 of 2 CPD
citrate phosphate dextrose solutionProduct Information Item Code (Source) NDC: 0942-0011 Route of Administration INTRAVENOUS Active Ingredient/Active Moiety Ingredient Name Basis of Strength Strength TRISODIUM CITRATE DIHYDRATE (UNII: B22547B95K) (ANHYDROUS CITRIC ACID - UNII:XF417D3PSL) ANHYDROUS CITRIC ACID 1.84 g in 70 mL DEXTROSE MONOHYDRATE (UNII: LX22YL083G) (ANHYDROUS DEXTROSE - UNII:5SL0G7R0OK) DEXTROSE MONOHYDRATE 1.78 g in 70 mL ANHYDROUS CITRIC ACID (UNII: XF417D3PSL) (ANHYDROUS CITRIC ACID - UNII:XF417D3PSL) ANHYDROUS CITRIC ACID 229 mg in 70 mL SODIUM PHOSPHATE, MONOBASIC, DIHYDRATE (UNII: 5QWK665956) (PHOSPHATE ION - UNII:NK08V8K8HR) SODIUM PHOSPHATE, MONOBASIC, DIHYDRATE 176 mg in 70 mL Inactive Ingredients Ingredient Name Strength WATER (UNII: 059QF0KO0R) Packaging # Item Code Package Description Marketing Start Date Marketing End Date 1 NDC: 0942-0011-01 70 mL in 1 BAG; Type 1: Convenience Kit of Co-Package Marketing Information Marketing Category Application Number or Monograph Citation Marketing Start Date Marketing End Date NDA BN811104 06/10/2022 Part 2 of 2 ADSOL RED CELL PRESERVATION
adsol red cell preservation solutionProduct Information Item Code (Source) NDC: 0942-0012 Route of Administration INTRAVENOUS Active Ingredient/Active Moiety Ingredient Name Basis of Strength Strength DEXTROSE MONOHYDRATE (UNII: LX22YL083G) (ANHYDROUS DEXTROSE - UNII:5SL0G7R0OK) DEXTROSE MONOHYDRATE 2.42 g in 110 mL SODIUM CHLORIDE (UNII: 451W47IQ8X) (SODIUM CATION - UNII:LYR4M0NH37) SODIUM CHLORIDE 990 mg in 110 mL MANNITOL (UNII: 3OWL53L36A) (MANNITOL - UNII:3OWL53L36A) MANNITOL 825 mg in 110 mL ADENINE (UNII: JAC85A2161) (ADENINE - UNII:JAC85A2161) ADENINE 30 mg in 110 mL Packaging # Item Code Package Description Marketing Start Date Marketing End Date 1 NDC: 0942-0012-01 110 mL in 1 BAG; Type 1: Convenience Kit of Co-Package Marketing Information Marketing Category Application Number or Monograph Citation Marketing Start Date Marketing End Date NDA BN811104 10/03/2025 Marketing Information Marketing Category Application Number or Monograph Citation Marketing Start Date Marketing End Date NDA BN811104 10/03/2025 Labeler - Fenwal, Inc. (794519020) Establishment Name Address ID/FEI Business Operations Fresenius Kabi Horatev CZ s.r.o. 888854531 MANUFACTURE(0942-6550, 0942-0011, 0942-0012) , ANALYSIS(0942-6550, 0942-0011, 0942-0012) , LABEL(0942-6550, 0942-0011, 0942-0012) , PACK(0942-6550, 0942-0011, 0942-0011) , STERILIZE(0942-6550, 0942-0011, 0942-0012)


© 2026 FDA.report
This site is not affiliated with or endorsed by the FDA.